Wednesday 23 July 2014

Adventures in screen printing

I haven't done much knitting or crocheting of late. Mainly because I have been busy working on a special, secret project which I couldn't talk about until after the most recent LARP event! At the previous event in June, I had agreed to make some sashes for my faction. They needed to look good, but be relatively simple to make as I had to make enough for fifteen people.

I decided the sewing part would be fairly simple, if I made long sashes which were tied on, rather than trying to make sashes to fit exactly. Especially considering the range of sizes in the group of people I was making them for - a huge variety of height and girth across the group. What I struggled with initially was a technique to use to get the symbols onto the sashes that I wanted - eight in total (one representing each of the in-character Gods worshipped in my faction, and one representing the faction itself). After chatting to a couple of friends, and doing some searching on the internet, I settled on screen printing as the most sensible route to take, and found this tutorial and this one. Initially, I thought I would try the embroidery hoop option, especially when I discovered you can now buy Modge Podge in Hobbycraft! But in the end I went for a very quick and lazy stencil only approach, with no screens at all.


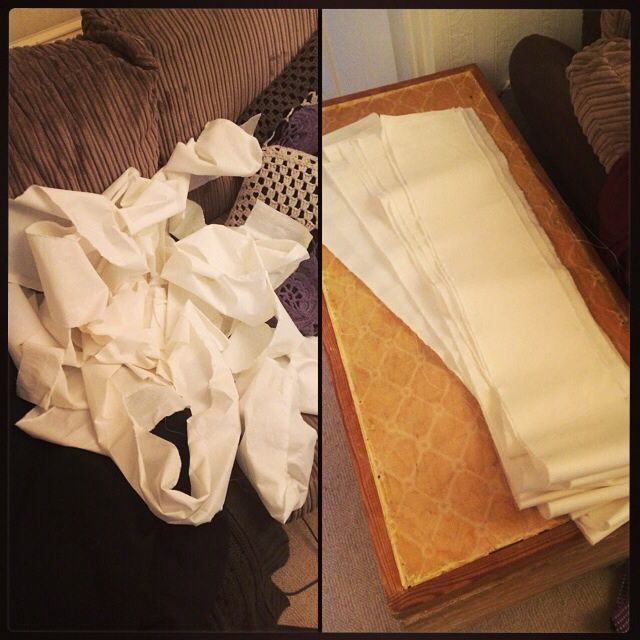
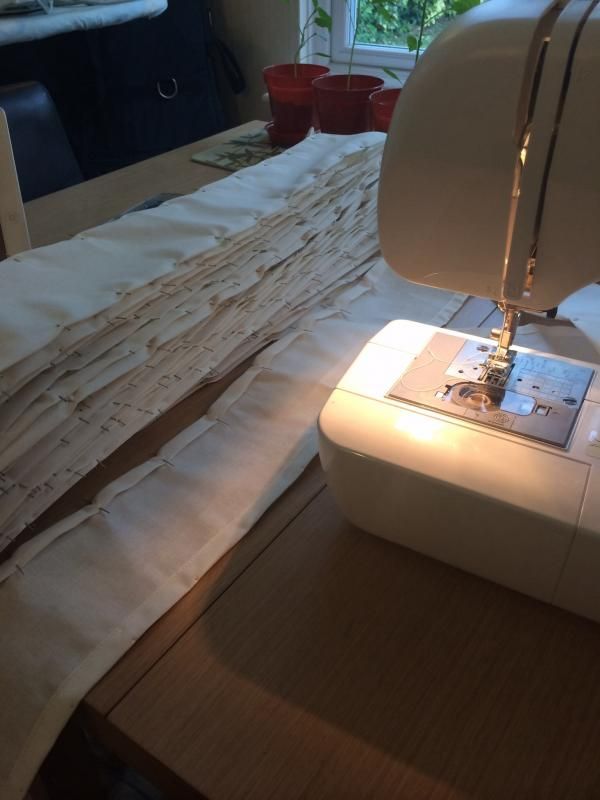
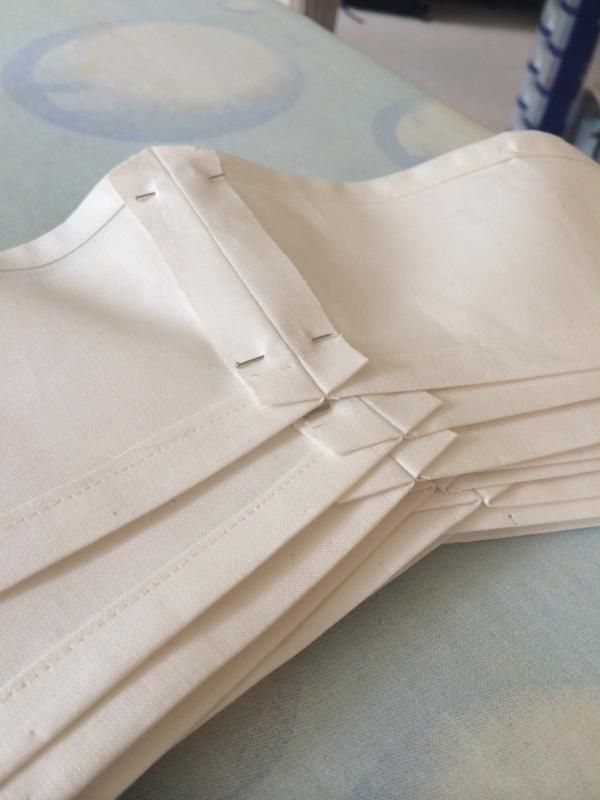
Preparing the sashes themselves was a bit more involved than I thought it would be. I bought 4 metres of 100% cotton in a lovely muted cream colour (as I thought white would be a bit too stark and modern for my needs). I tore the material into strips six inches wide, and ironed them out. Then came the endless pinning. I have never spent so much time pinning hems in all my life. Even the excessively long hems on my skirts didn't get that much attention.


It took me a day and a half to pin all the strips of fabric (260 feet of hem!). It then only took me about three hours to sew them all and remove the pins again. Because I was making these for other people, I decided to be very good, and did all the ironing and seam pressing you are meant to do when you sew things. I even top stitched the seams at the shoulder, once I had pinned and sewn the front and back halves together.


For the symbols, I took inspiration from the descriptions of the Gods as listed on my faction's website (www.cplions.co.uk). The standard symbols (things like scales of justice, swords etc) didn't seem exciting enough to me, so I was interested when I saw each God had a bird associated with it as well. I immediately went searching on Google for tribal tattoo style images of the birds in question, and made stencils of those.

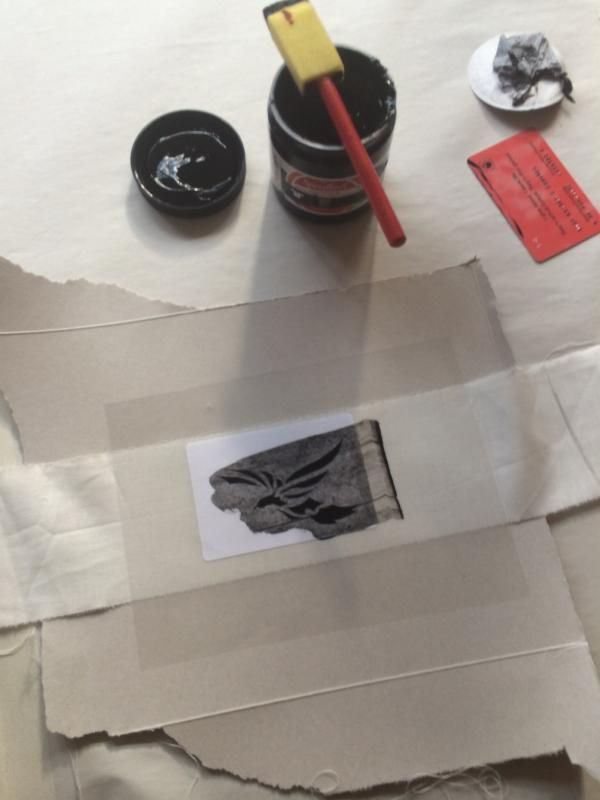
The stencils are just OHP acetate sheets, with a sticker stuck on that I'd traced the image onto. This made it easier to cut it out!

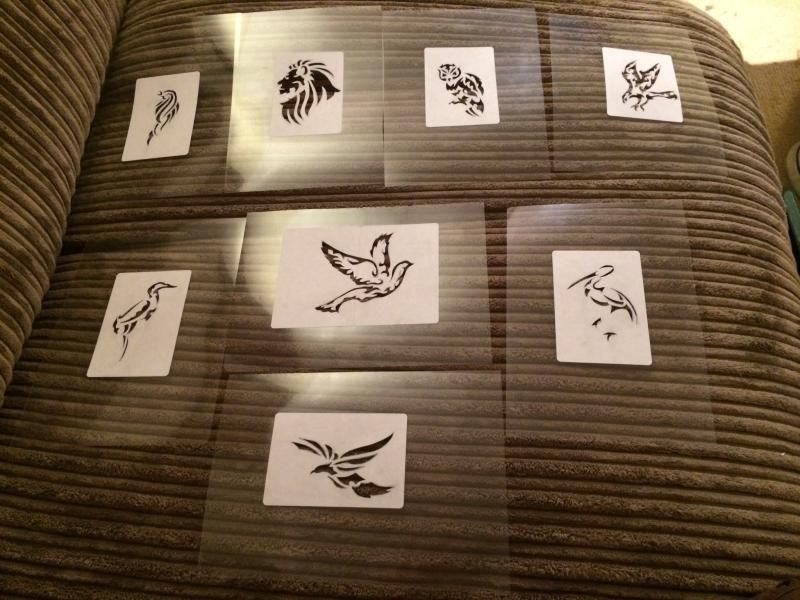
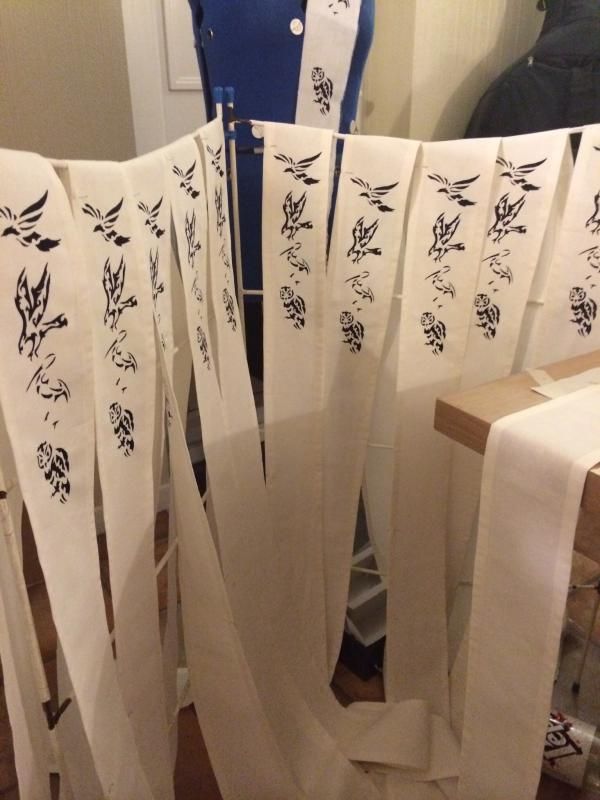
Top row L-R: nightingale, lion, owl, hawk
Middle row L-R: Heron, dove, stork
Bottom: raven

The dove in the middle of the above pic actually didn't make the cut, it was too big and complicated so I replaced it with a different design in the end.

When it came to the printing, I kept things as simple as possible. I set up a production line in my kitchen, and prepared my stencils by spraying the backs with removable adhesive spray. I sort of fudged my way through the screen printing itself, using the basic understanding of the technique I had learned from the tutorials linked above.


I bought proper screen printing ink in black, found a foam brush in my box of craft tools, and dug out an old blood donation card. I pretty much just blobbed ink on over the stencil with the brush, then drew the card across to even the ink out inside the stencil and scrape off the excess. It worked pretty well!


The only real pain was the time it took for the ink to dry. I had to do each bird separately, as otherwise the stencils overlapped with the still wet image above. So I did 13 ravens, then waited a bit. Then 13 hawks. And so on until they were all done.


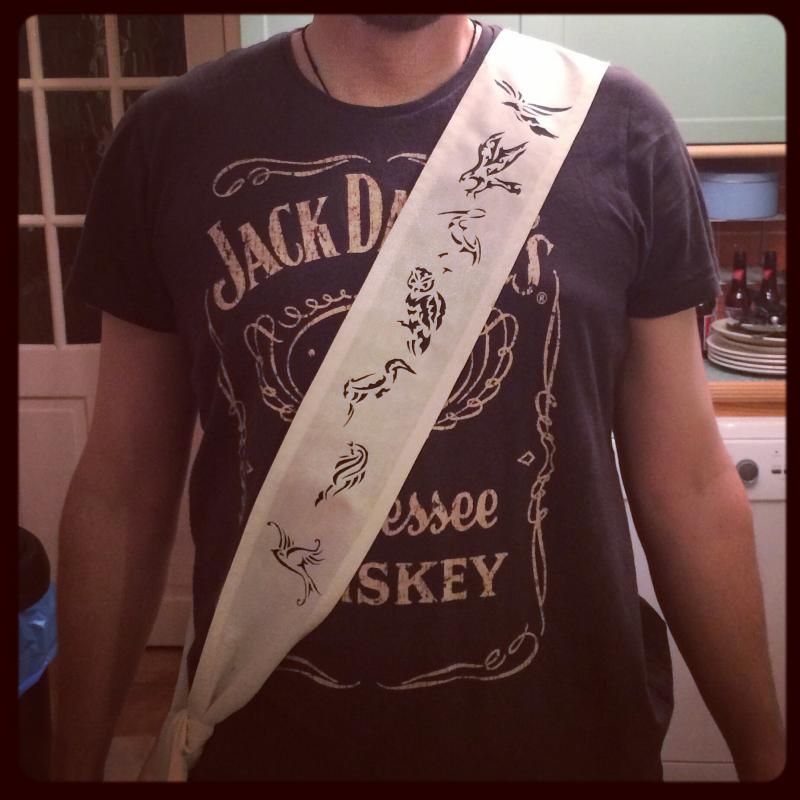
Just to give you an idea of the finished article, I got my husband to try one on. All I did to them after this point was paint the legs of the storks on (as they were very thin on the image and I wasn't sure I could cut the stencil delicately enough). The Lion is on the back, over the shoulder blade.


They turned out so much better than I was expecting, and once we had them out at the event and people were wearing them, I was even happier. No photos, sorry, I was far too busy! They generated some lovely roleplay as well, as people debated over which bird symbolised which God and why.

I have another one to make before the event in August, which gives me only 4 weeks. This one will be posher, made of thicker material (probably white cotton drill, I am going shopping on Saturday to find some), and will have black bias binding around the edge. I'll probably space the symbols out so half are on the front and half are on the back. Will share progress once I get started on it!

Friday 18 July 2014

FO Friday: My Little Leo


I'm reaching back a few months with today's FO Friday, to a small project I completed just after Christmas. It was a birthday present for a good friend of mine.


My friend Kate has a very special horse. His name is Leo. He's almost 20, and has had a very checkered history, suffering from several injuries through his career and being almost written off more than once. When Kate met him, he was in very bad shape. Together, they have brought him back to good health, to the point where she has been able to ride him in various competitions. You can read more about them on their Facebook page.

Photo copyright Kate Lee

Isn't he beautiful? He's wearing a disabled badge in his coat because both Leo and Kate are a little wonky. She jokes that between them, they have four working legs.

I got it into my head that I wanted to make her a miniature version of Leo for her birthday. I hunted round Ravelry until I found a pattern that was perfect. It's a free pattern called My Little Pony: Friendship is Magic School Age Ponies by Knit One Awe Some. I thought I had enough yarn in my stash for it, but ended up buying more as I didn't quite have as much as I thought.


I customised the pattern a little bit, to match as closely as I could to Leo's colouring. It's Hobbycraft's own brand value DK black yarn, and Sirdar Country Style DK for the brown, which makes him an interesting mix of acrylic and wool. I had a lot of fun with the mane and tail, but my favourite part has to be the felt pieces I attached afterwards. The eyes are cute enough, but in order to make My Little Leo as close to the original as possible, I cut out a felt disabled sign to sew to his bum.


Not pictured is the little red felt saddle I made, with the name Leo embroidered (probably quite badly) across the top. By the time I finished that I was in quite a rush to get the horse into the parcel and send it off to Kate! But you can kind of see it in the photo below, when My Little Leo met his namesake for the first time.

Photo copyright Kate Lee

Before you dash off to Tami's to read another few FO Friday posts, I do wonder if I can ask you a quick favour. Kate is currently in the middle of a fundraising attempt, which will either get her enough cash to sort out her new saddle, or at the very least help fund training and transport costs as she and Leo pursue a new para-equestrian career in endurance riding. I'm not asking you for money, but just a couple of minutes of your time. You see, Kate is a contender for this month's Mars Milk Sports Fund, and if she wins the public vote she will be awarded a prize of £1,000! All it takes is to click on THIS LINK, read Kate's story in her own words, then click the big blue vote button and enter your email address. In order for your vote to count, you do then have to open the email Mars will send you and click on the link in it to verify your vote. If you don't do that, your vote won't count. Sadly, only one vote per email address (otherwise I'd have been sat here for days repeatedly voting for her).

Kate would love you all forever if you did her this teeny tiny favour! You can follow her and Leo's journey by liking their Facebook page, or by following them on Twitter @FourGoodLegs.

Friday 11 July 2014

FO: Shawls for LARP


I seem to have the worst luck when it comes to making shawls to wear to LARP. I made one back in 2011, which I wore for a season before I lost it at an event. So I made a replacement, but that has also now disappeared!

After going to the first event this year back in May without a shawl, I discovered very quickly that I don't like the evenings without something warm to wrap around my neck! So when I came back from that event, I decided to raid my stash and make myself a new shawl.


The pattern I chose is called Cheche a la sauce. I always choose crochet patterns for my LARP shawls because they work up so quickly. The yarn is Sirdar Supersoft Aran which I had left over from a couple of older projects. The red and green were used for the tomato hat I made for my friend's daughter, and the blue is from the Wycombe Wanderers hat and gloves I made for one of my colleagues. I made it bigger than the pattern, working the first section till I ran out of red. I did run out of the blue before finishing the border section, but you can't really tell.

I took this one to the last event, and it came in extremely handy as it rained very heavily on the Saturday evening (the biggest storm ever, according to the news reports!). However, the shawl is perhaps going to be too warm for the event this weekend, as the July event is traditionally the hottest of the year. So I ordered another ball of James C Brett Marble Chunky, and crocheted a third version of the original!


I've gone back to my original colour choice for this one, and hopefully I won't lose it almost as soon as I start wearing it!

Sunday 6 July 2014

Happy New Year!!


It's finally here! The new Year of Projects officially started on 1 July! Lists are popping up all over the place, and everyone is very excited to get started. All the details can be found on our Ravelry Group.

I've written and re-written my list a number of times this year, but have finally settled on a mixed approach, combining a number of different ideas into one list. Finishing WIPs, working from my Ravelry queue, using up stash and continuing work on my long term design project. My full list can be found on my Year of Projects 4 page. 23 different projects this year, which given I had a finishing total of 19 last year doesn't sound unreasonable. There's a nice mix of projects, from socks to shawls to household decor. Some will be fairly quick knits, while others may take a bit longer.

I'm not actually starting work on the list yet, as I am right in the middle of LARP season and busy sewing things for that, which I will share after the event (as they are sort of a surprise for people and I don't want to spoil that). Which means there probably wont be an update next Sunday as I will still be in a field!

In the mean time though, head on over to the group, and check out everyone else's lists!

Tuesday 1 July 2014

Life long commitments

It is hard to believe, but halfway through my most recent absence from this blog, our wedding anniversary came and went. A whole year has passed since we got married, and it really doesn't feel like it. Life hasn't really changed all that much! 

We didn't really do anything to mark the occasion, as our anniversary coincides with the start of the LARP season, and so there will always be an event the weekend before! This year, there was also an event on the weekend itself, so my husband was not actually here for the day itself.


I marked the day by finally getting one of our wedding photos printed and framed for the mantlepiece. This was a real bargain, as the frame was £1.99 in a charity shop and the photo was a whole £3 from Snapfish.co.uk! I got luck with the frame, as it's A4 sized and exactly the same colour and style as the two frames I already had on the mantlepiece, plus our beautiful antique mirror we have above.

It is kind of strange having photos of myself and my husband on display in the house. It's not something we normally do. But wedding photos are different, I guess. They have their own rules!


I was also struck with inspiration for a rather long term sewing project. For the wedding, in place of a guest book, we had a "wishing tree" on which our guests could hang butterfly shaped message cards. After the wedding, the cards got packed away in a box, and I've had this ridiculous white tree hanging around my living room ever since. At Christmas we put ornaments on it and turned it into a ridiculous decoration you'd probably find on Pinterest. Now, it lives in the corner on top of the bookcases I keep all my crafting things in.

I decided it needed proper decoration, so I set about making an ornament to mark our anniversary. I dived into my fabric stash, and dug out some purple and dark pink felt, and scraps of the gorgeous pink batik fabric I bought to make LARP kit with a couple of years ago. The end result was this:


A little heart shaped ornament (it's about two inches across), marking our first anniversary. I embroidered the date on the back:


I will of course make one every year, although I haven't decided yet whether they will all be hearts, or whether I will explore other shapes as the years go by. At the moment, the tree still looks pretty bare, as it only has one ornament on it. I reckon by the time we reach our fifth anniversary it will start to look really pretty!

Sunday 29 June 2014

Year of Projects 3: Round up


We have finally reached the end of the third Year of Projects! I don't know where the last six months have gone. I seriously fell off the wagon a few months ago, and have barely touched the list since then. The last "proper" finish was back in January! That said, I have a substantial list of finishes covering all areas of the list I wrote last year, so despite the last few months I am considering this year a success.


Existing WIPs

Ok, so I didn't finish my beads-and-laceweight epic. Starlight became Chunari, and has languished without a further stitch knit since about April. Peerie Flooers remains sad and unblocked. However, I did finish my Obnoxious Socks, and have vowed to never knit another pair of knee high socks again.

Carried Forward from Last Year

A lot more success in this category! I finally knit my Ishbel shawl, and I love it. I wore it so much over the winter and early spring. Such a cheerful colour. And $5 in Paris was a quick and easy knit once I got started. I loved knitting with the Cascade 220 I bought in San Fransisco, and I loved the pattern so much I have another on the needles already.

The rest of my list

I successfully turned my Cascade Ultra Pima Paints into a hat, and knit several dishcloths from my stash of Lily Sugar'n Creme. Of the four skeins of yarn I set aside for shawls, two have been knit - Wingspan and Dragonfly Wings.

I did fall down on the sock front, as none of the sock yarn I had lined up made it even onto the needles, let alone into finished socks. Must do better this year!

Baby things were more of a success, with three baby blankets for various work colleagues, and a couple of adorable toys for Christmas presents for my friends' children. Including the dinosaur I'd been itching to knit for a long time.

The Ridiculous Never-ending Project of Doom

Well, I made a decent start on the Game of Thrones blanket. Charts all done, and converted to colourful Excel spreadsheets. I've even finished designing the layout and the centre chart! As far as knitting it goes, two and a half out of ten (eleven, counting the centre) charts is not great showing, but intarsia is tricky and requires concentration!


So, 19 finished projects to show, plus two new WIPs. I think that's more than I did in Year 1 or 2! With any luck, I'll stay focused this year and manage even more finishes from my list!


I'll be posting up my new list next week, in the mean time head on over to our Ravelry group if you want to join in the fun with Year Four of the Year of Projects!

Friday 27 June 2014

FO: Harlequin scarf


Hey everyone! I knew that I hadn't posted in a while, but it wasn't until a friend visited last weekend and pointed out that I hadn't posted in ages that I realised it has been about two months since my last post! Unfortunately, life has got in the way of crafting, or doing particularly interesting things, so I haven't had all that much to post about. There are a few things I've made/done/worked on in these last few months that haven't made it onto the blog, however, so I'm going to try and catch up over the next few weeks. The new Year of Projects starts next week as well, which will be an extra kick to get me back into my good habits.


So, as it's Friday, I'll start things off by linking up with Tami and sharing a finished project.


I cast this on back at the end of March, when I was ill with a virus and not keen on knitting complicated lace-and-beads or intarsia. The yarn is Stylecraft Harlequin Chunky and the pattern I chose to use was the Sulka Scarflette. It was incredibly quick and easy to knit up (only a couple of hours in total) but it took me almost a week because I was so ill I couldn't knit many rows before having to put it down again. It also took me a while to decide where to put the buttons!

I haven't worn it yet because the weather warmed up considerably after I made this, and I think it would be best suited to the really cold days in January and February. So for now it is resting on the shelf in the hallway, waiting for winter to roll back around.


Monday 21 April 2014

Year of Projects 3 - 21st April update


Happy Easter! I hope you are all having a lovely long weekend. I have been busy, doing traditional bank holiday activities such as gardening, and cleaning the house. However, I have found time to catch up on some YoP knitting!


Remember the charts I designed for my Game of Thrones inspired blanket? Now the show is back on the air I have been inspired to start working on this again. When I last put it down I was so close to finishing knitting up the first chart. And now I have!


I am now working on the chart for the name Stark, which is proving to be even more irritating than the shield motif. I am using a blend of intarsia and stranded colour work now, as to do this part wholly with intarsia would involve far too many separate bobbins of yarn and it would drive me crazy.

The other thing I have done is finalise the layout of the blanket. I have a large section in the middle which is still to be designed, and I have no idea what I am going to put in it! Originally I was thinking of having it say "Winter is Coming" but the other day my husband suggested something that involves the phrase "valar morghulis" might be cooler. We shall see. I am more inclined to make it an image rather than lots of words as I think that would be less annoying to knit. He did also suggest a picture of the iron throne, but I'm not sure that would work either.

Tuesday 15 April 2014

Adventures in book binding

With the new LARP season rapidly approaching (our first event is only a few weeks away!) I decided to take a break from my usual crafty pursuits and learn something new. I've been planning to make myself an in character diary for some time now, but it would involve skills that I've never tried before.

Firstly, I had to write the damn thing! I'm not usually all that interested in writing fiction, but thankfully the act of writing up my character's thoughts and experiences from the four years that I've now been playing her was easy, as I was actually recording memories of events rather than having to make it all up from scratch! I started writing it after getting back from an event, so I was still very much inside my character's head at the time. Before I knew it, I'd written over 30,000 words.

To turn my words into an actual, physical book proved to be more of a challenge. I spent a lot of time on the internet, researching bookbinding techniques and trying to decide what I wanted my finished diary to look like. I eventually settled on the long stitch technique, after seeing this tutorial for a leather bound journal. I had in my sewing chest a suede skirt that I've been holding on to for a long time, waiting for the right project, which I decided would be perfect to use as the material for my book cover.


Printing the pages to create the signatures for my book proved to be another challenge. More research online unearthed this fabulous guide to printing Word documents in book format, and after a few trial and error attempts I finally had my pages printed.


I did a test of the bookbinding techniques on a set of signatures that hadn't printed out right, and then launched straight into stitching my actual pages into my actual book. It was really straightforward, although I did manage to stab myself quite a few times with the needle as the suede was quite thick, particularly where there was more than one layer.


I deliberately left the flap that will close the book quite long, as this is going to be a living document that will grow with each LRP event. I have bound in some empty pages so I can jot down notes during the event, and then afterwards I will type up the diary entry and replace the handwritten signatures with a printed version. The more events I survive, the longer my book will get, but there is room for at least twice as many pages before this one gets full.


To close the book, I have added two ribbons, and attached a gorgeous bead I picked up in my local haberdashery. I'm really really pleased with the finished article, and can't wait to show it off at the event in a couple of weeks.

Friday 4 April 2014

Planning ahead

Last weekend I went on a bit of an online spending spree. It started out fairly innocently; I'd seen a pattern in a magazine that I wanted to knit, I had the yarn in my stash but didn't have the right needle. Usually, what I do in this case is go to eBay and find myself a needle in the correct size and length. However, I didn't find anything in the right size apart from the really cheap bamboo needles with those nasty thick plastic cables. While I do have quite a few pairs of those in various sizes, since I started buying nicer needles (like the Addi turbo needle I bought to make my Christmas Stockings, and the KnitPro Novas I used for Mrs Tumnus) I don't really want to go back. But it would cost a fortune to stock up on every needle I need buying posher needles individually.

Once I came to that realisation, I spent a good hour or so browsing the web and reading reviews of the various interchangeable needle sets out there to try and help me decide. I was very tempted by the KnitPro Symfonie set, particularly after reading several comparisons between them and the Addi set (I do like my Addi needles, but looking at the interchangeable set, the needles are nowhere near pointy enough for me). However, my ultimate decision came down to my preference for metal over wood for circular needles.


In the end, I bought a set of Nova interchangeable needles from Hulu Crafts. The set comes with needles from 3.5mm up to 8mm, and four different cables in three different lengths.


For a deluxe set, I have to say it doesn't come with a particularly nice case. It's perfectly serviceable, but having seen the gorgeous cases you get with HiyaHiya needles (see here, Deramores stock them separately to the needles themselves) I feel like I should have a better case for mine! I've had a look around and there's plenty of inspiration out there. Of course, I won't stop with just a case for these, I will figure something out for my fixed circulars as well!

My shopping problem really kicked off once I started wandering the rest of the Hulu Crafts website to see if there was anything else that could slip into my basket while I was there. Sadly, I couldn't quite justify buying more Lily's Sugar'n Creme so I ended up checking out with nothing but the needles in my basket. Not satisfied, I headed straight over to Deramores and started filling my basket with yarny goodies.


There's a lot of black yarn in my parcel, which is completely unintentional! There are two balls of Rico Fashion Fur, which is going to be used to knit this cat which is in a pattern book my husband gave me for Christmas. The ball of Red Heart Baby in brown next to them in the picture above is also for the cat, to do his nose, ears and paws. I am uncertain whether I have enough yarn, as the pattern is not specific about yardage, gauge and size, and there aren't many finished projects on Ravelry either.

The black Bamboo cotton is to supplement the remainder of a ball I already have, to be paired with the half skein of Cascade Ultra Pima Paints cotton I have left over from my trip to San Fransisco.


The rest of the yarn is Stylecraft Special Aran. It has the same gauge as the Cascade 220 I used for $5 in Paris, so I should be able to replicate the project quite easily. This time, I will use three colours, black, red and silver-grey. I haven't decided on the stripe pattern yet, but I do know I want this one to be longer in the body and have longer sleeves than my first version.

Now that I have new yarn, and new needles to play with, I am going to have to try very hard to make sure I finish what I've already started before casting on something new!

Wednesday 2 April 2014

The art of procrastination


Those of you who know me well, will not be surprised to hear that instead of working on my current projects (including one with a deadline to meet!), I have in fact cast on something new. I've not been very well this week; some sort of horrible virus is doing the rounds and I have spent the last four days lying on the sofa in a cloud of misery.

With my brain in such a fog, there was no way I was going to handle delicate lace or knitting on DPNs. I didn't even think I had the brainpower for dealing with my Game of Thrones blanket square, although the trickiest parts of the intarsia are over for now. I needed something simple.


To me, nothing says simple and rewarding quite like working with chunky yarn. I've had this in my stash for some time now, and decided that it was time to use it. I initially planned to crochet it, using this Lion Brand pattern as inspiration for a stripey beanie. I've used it before, and was quite pleased with the results. However, I wasn't enjoying it in this chunky yarn, so went back to the drawing board (i.e. the Ravelry pattern search) to find new inspiration.


This is the result. The pattern is Sulka Scarflette by faerybabys and it is knitting up a treat. It's 13 inches long now and there's still plenty of yarn left. My plan is to knit until I run out, and then attach the buttons in an appropriate place after it's been blocked and I've had a chance to try it on.
Related Posts Plugin for WordPress, Blogger...