Back in October last year, I took some time out of my knitting/crocheting schedule to help Jamie out with his Chaos Space Marine army. See, the deal we have is he paints the models, but I do the bases. I did a few funky rocky bases, but was then struck with the inspiration to make some proper scenery.
 |
| Serious crafting requires artistic vision |
I started small, just some interesting embellishment for the flying base of his heldrake model and a simple rocky outcrop to use as terrain during a game. The building part didn't take very long, but I lost interest when I was stuck with the endless painting.
Now we have an airbrush, the painting part is a lot easier, so I've pulled it all back out and set to with a will! First to finish, the heldrake base.
After placing the flying stem and gluing it down, I used cork sheeting and a hot glue gun to add some height to the flat base.
I filled the rest of the base with plain old boring basing material (I think this one is labelled as "lava").
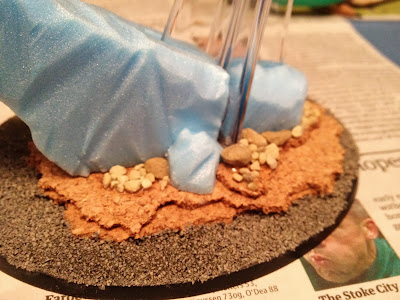
Next up was the fun part. The rocky spur was made from polystyrene sheeting, cut and carved to fit with a hot wire cutter. I love my hot wire cutter, it's so much fun! I had to cut two separate chunks to get it to fit around the stem.
Carving it to look like rock is a real skill!
The ground around the spire was decorated with smaller stones and some carved boulders.
The stem was then masked with tape to protect it from paint. All of the rock parts were painted with textured masonry paint (a couple of coats) and then the whole model was undercoated with black spray. At this point I got fed up of the painting aspect (it takes ages to dry!) and the base remained in this state until last week.
After just half an hour with the airbrush (most of which time is spent cleaning the damn thing between colours, and hunting for the right bottle of paint) the rocks were done! All over spray with a dark grey, then an almost all over spray with a lighter grey, finally targeted highlights with a light grey.
The sand was sprayed dark brown, then highlighted up with two lighter shades of brown. I wanted the model to fit the colour scheme of the other bases I'd painted last year, sandy bases with grey rocky outcrops.
The finishing touches were the greenery. Some twigs robbed from the back garden, pushed into the polystyrene behind the stem become trees, with clump foliage (from the model railway section of the model shop) glued on with Copydex (which smells of fish, by the way, it's horrible stuff). Some additional clump foliage around the base of the tree and to hide the hole where I miscut the rocky spire to fit the stem, and some static grass on the sand to cover the gaps.
I really love the effect of the tree. I'm also really pleased at how closely my finished base resembles my initial visualisation!
Jamie has since bought a second heldrake, so I will be putting my thinking cap on again to create a second base that matches but is different.
In the meantime, I'm going to finish painting the rocky spires terrain piece, and a gothic ruin piece I started at the same time as these. With the ease of painting provided by the airbrush, I can see myself making a lot more scenery over the next few months!


If you ever get tired of your job, I bet you could make a killing with those........then again, skilled labor costs money and no one seems to want to pay for it :)
ReplyDeleteWhy yes, I understand selfish crafting, why do you ask?
That's awesome!!!!!
ReplyDeleteOh, wow! That's super interesting! How cool.
ReplyDeleteWhile I don't really know what a heldrake is, I am figuring out that this must be something from the gaming world. What an impressive amount of work goes into just one piece! It turned out beautiful with so much attention to detail and shading with the paint!
ReplyDelete*smiles*
WOW! That's incredible!
ReplyDelete